
If Dubsado has you staring at your screen thinking, “Okay…but, now what?” — I’ve got you. 💁🏽♀️
As a Certified Dubsado Specialist, I always recommend starting with your Inquiry Workflow. It’s the foundation of your client journey — and the easiest one to get up and running.
This single workflow ensures new leads don’t fall through the cracks and that every potential client gets a seamless, professional first impression (automatically). This inquiry workflow will provide your new leads with a basic first step and follow-up. Bonus, I’ve also included steps for a more indepth aut
‼️ Disclaimer: If you are new to Dubsado, workflows are the LAST area of your system you should address. Check out the Ultimate Dubsado Setup Checklist to help you get started!
What You’ll Need Before You Build the Workflow
Before heading into Dubsado’s workflow builder, you’ll want to prepare these key assets:
1. Lead Capture Form
The form that new leads will complete to inquire about your services.
Required Fields:
- First name
- Last name
- Phone number
- What service are you interested in? (dropdown)
- How did you hear about us?
- Any other questions you need to pre-qualify leads
Pro Tip: Embed this on your website, link it in your IG bio, or share it via DM — wherever your leads are coming from.
2. Inquiry Email Series (Write These First!)
You’ll be using a series of automated emails to engage leads even if they don’t book right away. Here’s what to create:
- Initial Inquiry Email Reply – Sent right after someone submits the form
- Follow-Up Email #1 – Sent 2 days later if no booking happens
- Follow-Up Email #2 – Sent after the second attempt
- Final Check-In Email – Sent 3 days after the last email with one last scheduler link
Be sure to include the schedular smart field, {{ scheduler | schedulerLink }}, in each email
3. Scheduler Templates
Create three versions of your inquiry call scheduler:
- Scheduler 1 – Linked in the initial inquiry email
- Scheduler 2 – Used in Follow-Up Email #1
- Scheduler 3 – Used in Final Check-In Email
This allow the workflow to continue and react based on each scheduler that’s sent while keeping the lead flow consistent.
Inside each scheduler, attach:
- Confirmation Email
- Reminder Emails (24 hours and 1 hour before the call)
4. Organize with Tags and Statuses
Project Statuses:
- New Lead
- Pending Inquiry Call
- Upcoming Inquiry Call
- Lost Lead
Project Tags (Optional but helpful):
Use these to organize leads by service type or referral source if you’d like to segment later.
Step-by-Step: How to Build the Inquiry Workflow in Dubsado
Here’s how to structure your workflow once your assets are ready:
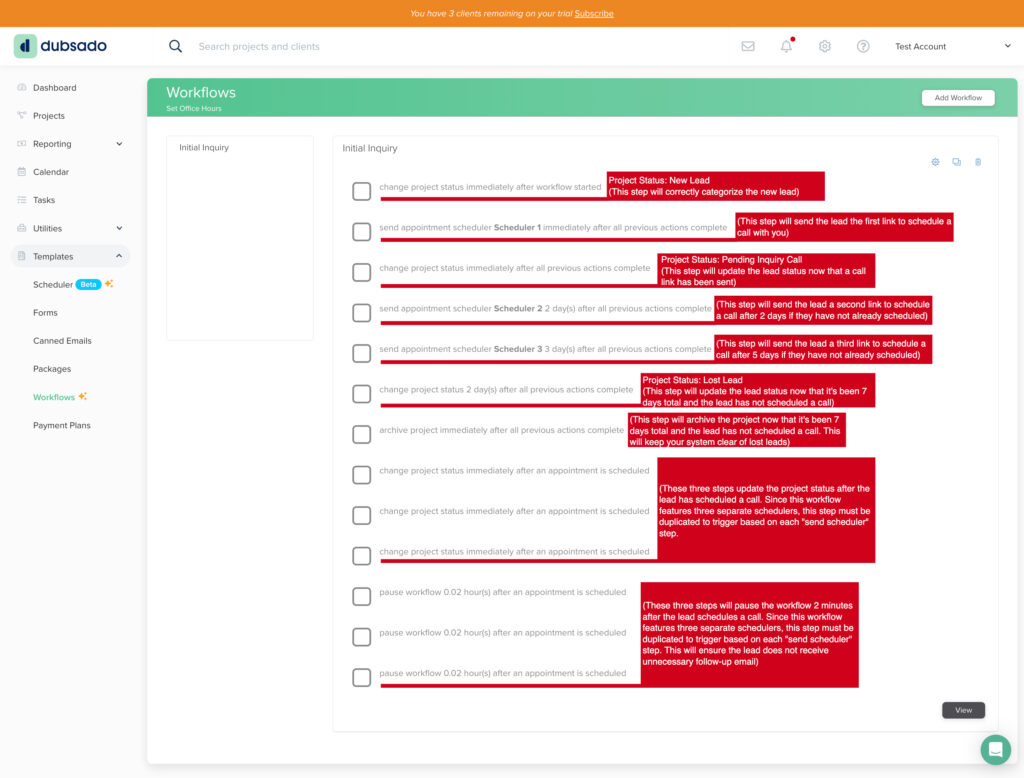
1. Change Project Status
- Action: Change Project Status
- Trigger: Immediately after workflow starts
- Set Status: New Lead
2. Send Scheduler (Scheduler 1)
- Action: Send Appointment Scheduler (Scheduler 1)
- Trigger: Immediately after all previous action complete
- Email: Initial Inquiry Email Reply
3. Change Project Status
- Action: Change Project Status
- Trigger: Immediately after all previous actions complete
- Set Status: Pending Inquiry Call
4. Send Scheduler (Scheduler 2)
- Action: Send Appointment Scheduler (Scheduler 2)
- Trigger: 2 days after previous action
- Email: Follow-Up Email #1
5. Send Scheduler (Scheduler 3)
- Action: Send Appointment Scheduler (Scheduler)
- Trigger: 3 days after previous action
- Email: Final Check-In Email
6. Change Project Status
- Action: Change Project Status
- Trigger: 2 days after previous actions comeplte
- Set Status: Lost Lead
7. Archive Project
- Action: Archive Project
- Trigger: Immediately after all previous actions complete
8. Change Project Status (Duplicate for Each Scheduler
- Action: Change Project Status
- Trigger: Immediately after appointment scheduled
- Set Status: Upcoming Inquiry Call
6. Pause Workflow (Duplicate for Each Scheduler)
- Trigger: 0.02 hours after appointment is scheduled
Why This Works
A multi-step follow-up system means you’re not leaving potential clients behind after one email. By automating gentle reminders and offering multiple chances to book, you’re creating space for people to take action without needing to manually follow up yourself.
It’s consistent. It’s client-friendly. And it frees you up to focus on serving the people who do book.

